It has been a little over a year since vCAC 6.0 was released, so many folks who have deployed it in their labs, POCs or other environments for testing purposes are likely to have used the self-signed certificates created in the VAMI at install time rather than generating CA certificates. These certificates are only good for ONE YEAR, so I expect many folks will be running into issues soon if these certificates aren’t replaced before they expire. This issue only impacts the vRA virtual appliance and the Windows (IaaS Model Manager) host(s). If you are using the SSO identity virtual appliance, its self-signed generated certificate has an expiration date 10 years from deployment, so it won’t have this issue.
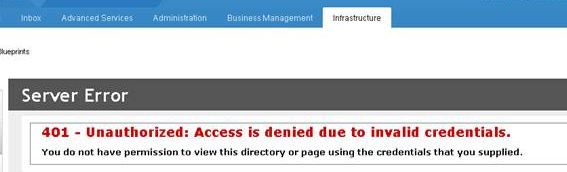
If it has been less than one year since you deployed vRA (vCAC), you can go straight to the vRA VAMI and start the process of updating your certificates. If it has been over a year, and you haven’t done so already, you will need to extend your root user password expiry (you won’t be able to log into the VAMI even with correct password if this is the case). When your certificates are expired, you will receive a 401 – Unauthorized: Access is denied due to invalid credentials error when accessing the Infrastructure tab.
The assumption here is that lab environments will typically use a simplistic deployment (single vRA VA and single Windows host for all IaaS components). If that’s not the case, there will be additional work to update certificates on all hosts of the deployment after they are generated.
Extending root user password expiry
If you’re root user password is expired on the VAMI, you can either reset it, or you can extend the expiration date using the following command. You will need to either SSH into the VA or use the remote console to execute:
chage -M 99999
vRA Certificate Update
Updating the certificate on the vRA VA is fairly straightforward. A new certificate needs to be generated, and then it needs to be registered with all of the IaaS components. These are the detailed steps:
-
Log into the VAMI using the root user. It is accessed by the following URL:
https://<em>fqdn-of-vra-va</em>:5480</li>-
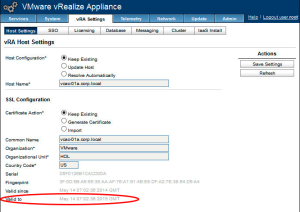
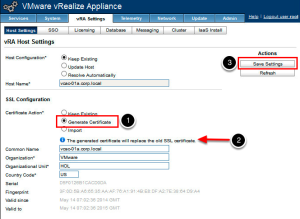
Navigate to vRA Settings, Host Settings tab. Here you can see details of the last certificate that was generated, including the current expiration date:
-
To generate a new self-signed certificate, first choose the Generate Certificate radio button under SSL Configuration (1). You will see an informational alert display that you will replace the old SSL Certificate with this action (2). Then click Save Settings (3). This will take a minute or two to complete. You should see a new expiry date reflected in the Valid to field.
-
The IaaS Model Manager host(s) now need to set up trusts for this new vRA VA certificate, and it must be added to the IaaS database. To complete the remaining steps, we must log into the IaaS Model Manager host and open an command prompt with elevated privileges (i.e Run As Administrator). From the command prompt, you will need to set your directory using the following command:
cd "C:\Program Files (x86)\VMware\vCAC\Server\Model Manager Data\Cafe"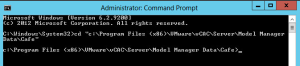
-
Use the vCAC Config command to copy the vRA VA certificate to the IaaS database:
vcac-Config.exe UpdateServerCertificates -d <em>vcac_database</em> -s <em>sql_database_server</em> -vFor my lab, for example, I would use
vcac-Config.exe UpdateServerCertificates -d vcac -s iaas-01a.corp.local -v</p>
If you are using a non-default SQL database instance, you would need to also append that to the SQL host name like this:vcac-Config.exe UpdateServerCertificates -d vcac_database -s sql_database_server\INSTANCE -v </li>
</li>-
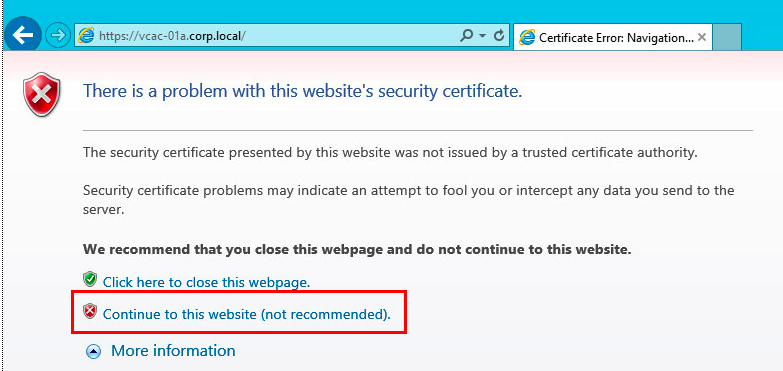
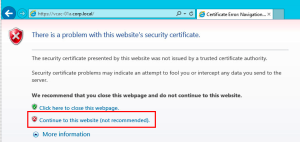
Now we need to import the new SSL certificate to the Windows trust store. The easiest way to do this is to open up Internet Explorer on the Iaas host and navigate to the vRA host. For my lab, that is:
https://vcac-01a.corp.local/Choose Continue to this website when the page loads.
-
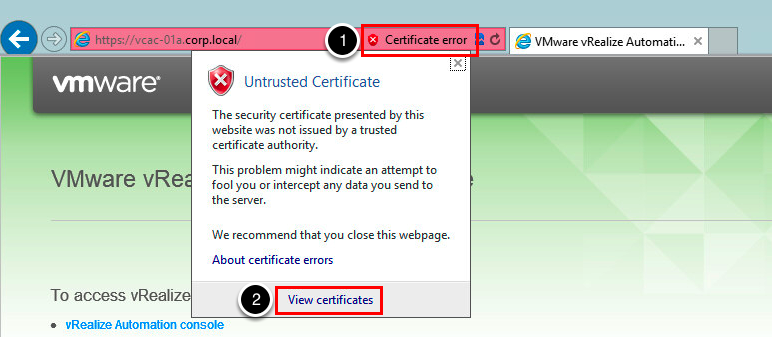
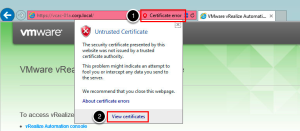
After the default site loads, a Certificate Error will be displayed next to the browser address bar. Click on this error and then click on View Certificates
-
To install the certificate, choose Install Certificate… and complete the wizard to install on Local Machine as shown here.

-
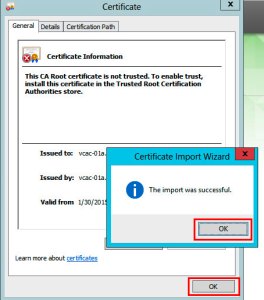
When completed, the following dialog will appear to confirm the certificate was installed properly. Click OK on both to close.
-
The last step to finish the install of the new certificate is to restart IIS. Return to your command window and run an
iisreset </ol>
</ol>
IaaS Certificate Update
The IaaS Model Manager host needs to also have a new certificate generated for it and then we have to update the vRA VA services with this new info. Follow these steps:
- On the IaaS Windows host, open the IIS Manager and navigate to the server in the left hand navigation, and open Server Certificates.
[<img src="https://grantorchard.com/assets/images/2015/01/IaaS-IIS-Svr-Cert-1-300x188.png" alt="IaaS IIS Svr Cert 1" width="300" height="188" class="alignnone size-medium wp-image-1179" srcset="https://grantorchard.com/assets/images/2015/01/IaaS-IIS-Svr-Cert-1-300x188.png 300w, https://grantorchard.com/assets/images/2015/01/IaaS-IIS-Svr-Cert-1.png 803w" sizes="(max-width: 300px) 100vw, 300px" />](https://grantorchard.com/assets/images/2015/01/IaaS-IIS-Svr-Cert-1.png) 2. Create new Self-Signed Certificate by clicking on that option on the right side of the window. [<img src="https://grantorchard.com/assets/images/2015/01/IaaS-IIS-Svr-Cert-2-300x103.png" alt="IaaS IIS Svr Cert 2" width="300" height="103" class="alignnone size-medium wp-image-1180" srcset="https://grantorchard.com/assets/images/2015/01/IaaS-IIS-Svr-Cert-2-300x103.png 300w, https://grantorchard.com/assets/images/2015/01/IaaS-IIS-Svr-Cert-2.png 825w" sizes="(max-width: 300px) 100vw, 300px" />](https://grantorchard.com/assets/images/2015/01/IaaS-IIS-Svr-Cert-2.png) 3. Provide a friendly name for the new certificate. I used similar format to the auto-generated one. Then click _OK_. [<img src="https://grantorchard.com/assets/images/2015/01/IaaS-IIS-Svr-Cert-3-300x229.png" alt="IaaS IIS Svr Cert 3" width="300" height="229" class="alignnone size-medium wp-image-1181" srcset="https://grantorchard.com/assets/images/2015/01/IaaS-IIS-Svr-Cert-3-300x229.png 300w, https://grantorchard.com/assets/images/2015/01/IaaS-IIS-Svr-Cert-3.png 681w" sizes="(max-width: 300px) 100vw, 300px" />](https://grantorchard.com/assets/images/2015/01/IaaS-IIS-Svr-Cert-3.png) 4. Navigate to the _Default Web Site_ in the left hand navigation tree and open _Bindings_ from the right hand Action menu. [<img src="https://grantorchard.com/assets/images/2015/01/IaaS-IIS-Svr-Cert-4-300x77.png" alt="IaaS IIS Svr Cert 4" width="300" height="77" class="alignnone size-medium wp-image-1182" srcset="https://grantorchard.com/assets/images/2015/01/IaaS-IIS-Svr-Cert-4-300x77.png 300w, https://grantorchard.com/assets/images/2015/01/IaaS-IIS-Svr-Cert-4.png 827w" sizes="(max-width: 300px) 100vw, 300px" />](https://grantorchard.com/assets/images/2015/01/IaaS-IIS-Svr-Cert-4.png)</li> * Choose _https / 443_ from the list and click _Edit_. Then select the SSO certificate you just created from the dropdown list and click _OK_. You can then Close the Bindings dialog. [<img src="https://grantorchard.com/assets/images/2015/01/IaaS-IIS-Svr-Cert-5-300x175.png" alt="IaaS IIS Svr Cert 5" width="300" height="175" class="alignnone size-medium wp-image-1183" srcset="https://grantorchard.com/assets/images/2015/01/IaaS-IIS-Svr-Cert-5-300x175.png 300w, https://grantorchard.com/assets/images/2015/01/IaaS-IIS-Svr-Cert-5.png 655w" sizes="(max-width: 300px) 100vw, 300px" />](https://grantorchard.com/assets/images/2015/01/IaaS-IIS-Svr-Cert-5.png) [<img src="https://grantorchard.com/assets/images/2015/01/IaaS-IIS-Svr-Cert-6-300x180.png" alt="IaaS IIS Svr Cert 6" width="300" height="180" class="alignnone size-medium wp-image-1184" srcset="https://grantorchard.com/assets/images/2015/01/IaaS-IIS-Svr-Cert-6-300x180.png 300w, https://grantorchard.com/assets/images/2015/01/IaaS-IIS-Svr-Cert-6.png 536w" sizes="(max-width: 300px) 100vw, 300px" />](https://grantorchard.com/assets/images/2015/01/IaaS-IIS-Svr-Cert-6.png)</li> * Return to your command window and run an `iisreset` [<img src="https://grantorchard.com/assets/images/2015/01/IaaS-IIS-Reset-300x55.png" alt="IaaS IIS Reset" width="300" height="55" class="alignnone size-medium wp-image-1176" srcset="https://grantorchard.com/assets/images/2015/01/IaaS-IIS-Reset-300x55.png 300w, https://grantorchard.com/assets/images/2015/01/IaaS-IIS-Reset.png 633w" sizes="(max-width: 300px) 100vw, 300px" />](https://grantorchard.com/assets/images/2015/01/IaaS-IIS-Reset.png) * Staying in the command window, we must run the following series of commands to push the new certificate to the vRA Services. Ensure you are still in the `C:\Program Files (x86)\VMware\vCAC\Server\Model Manager Data\Cafe` folder to run these commands: <pre name ="code" class="js">vcac-config.exe RegisterEndpoint --EndpointAddress https://IaaS_fqdn/vcac --Endpoint ui -v vcac-config.exe RegisterEndpoint --EndpointAddress https://IaaS_fqdn/repository --Endpoint repo -v vcac-config.exe RegisterEndpoint --EndpointAddress https://IaaS_fqdn/WAPI --Endpoint wapi -v vcac-config.exe RegisterEndpoint --EndpointAddress https://IaaS_fqdn/WAPI/api/status --Endpoint status -v </pre> [<img src="https://grantorchard.com/assets/images/2015/01/Screen-Shot-2015-01-30-at-6.03.05-PM-300x120.png" alt="vcac-config commands" width="300" height="120" class="alignnone size-medium wp-image-1189" srcset="https://grantorchard.com/assets/images/2015/01/Screen-Shot-2015-01-30-at-6.03.05-PM-300x120.png 300w, https://grantorchard.com/assets/images/2015/01/Screen-Shot-2015-01-30-at-6.03.05-PM.png 644w" sizes="(max-width: 300px) 100vw, 300px" />](https://grantorchard.com/assets/images/2015/01/Screen-Shot-2015-01-30-at-6.03.05-PM.png)</ol> For more information on replacing certificates, see Grant’s previous posts <a href="https://grantorchard.com/vcac/implementation/replacing-vcac-6-0-iaas-certificates/" title="Replacing vCAC 6.0 IaaS Certificates" target="_blank">Replacing vCAC 6.0 IaaS Certs</a> and <a href="https://grantorchard.com/vcac/implementation/replacing-vcac-6-0-appliance-certificates/" title="Replacing vCAC 6.0 Appliance Certificates" target="_blank">Replacing vCAC 6.0 Appliance Certificates</a>, and also the <a href="http://pubs.vmware.com/vra-62/index.jsp#com.vmware.vra.install.doc/GUID-F493819D-D4FB-4854-BEC4-295388BB6EF7.html" title="vRA Doco - Updating Certs" target="_blank">product documentation</a>. Special thanks, again, to <a href="https://twitter.com/stvkpln" title="Steve Kaplan" target="_blank">Steve Kaplan</a>! Kim Delgado is a Sr Solutions Engineer at VMware. She can be reached at @KCDAutomate. -
-