
I often get asked for some ideas outside of the usual in which hooking vCO into vCAC stubs provide a practical application. Our standard examples of this include IPAM and CMDB hooks, but sometimes the same old examples get a little old. This one I’m quite proud of, even if it required significant assistance from both Eric Hardcastle and Nathan Wheat. So here you go – VM placement for a vSphere Metro Storage Cluster as managed during vCAC provisioning.
When using vMSC, there is no concept of “location” that vCAC can grab hold of, so we need to make sure that when a machine is deployed, it is added to the appropriate DRS Rules for VM to Host Affinity – rules that I hope everyone who uses vMSC have configured.
Rather than assuming you have everything you need up and ready to run, let’s begin at the beginning.
Adding vCO as an Endpoint
- Login to vCAC, and navigate to Infrastructure > Endpoints and select New Endpoint > Orchestration > vCenter Orchestrator.

- Enter your vCO endpoint details, select a set of credentials (or create a new set within the dialog) and add the Custom Property as shown below. If you don’t do this you will get an error message when you click OK and nothing will happen.

- Click OK and you’re ready to rock and roll – or at least move onto the next step.
Installing the vCO Customisation
This one is a piece of cake. There is an Orchestrator workflow that takes care of this for you.
- Login to Orchestrator (I did this through the vSphere Web Client) and navigate to vCloud Automation Center > Extensibility > Installation > Install vCO Customisation and run the workflow.

- You’ll be prompted for token delegation – this is normal.

- Click on the green plus symbol, and then browse through the hierarchy per the second screenshot to get to your IaaS server.


- Select the stubs that you want to enable.

- Finally, select the number of menu operations you want to create (additional Day 2 operations).

- Select to Run the workflow now and click “Finish”.

- After a couple of minutes, you will see the following.

Attaching the Workflow to the Appropriate Stub for your Blueprint
- Choose the MachineProvisioned stub to enable on your Blueprint, then select a vCAC host (IaaS Server) by navigating the hierarchy per the second image.

- Click the “Insert” button to select the Blueprint to append the stub to.

- Navigate your hierarchy and select the appropriate Blueprint.


- Click in the check box so that vCAC properties can be passed through as values to vCAC, this is where you will select the Site that you want your workloads to be pinned to.

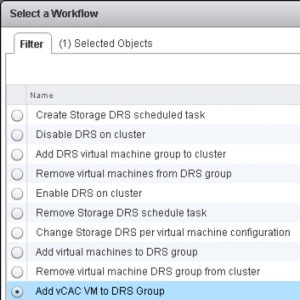
- In the filter, type DRS and then select the “Add virtual machine to DRS group”, and click the “Next” button.
- Select the “Run Now” radio button and click “Finish”.

DRS Configuration
- Here are my DRS Groups – I’m not going to take you through configuration of these, I’m assuming you know how to set this up.

- Ditto for my DRS rules to assign VM groups to Host Groups.

Onto the final piece of the puzzle – the Blueprint config.
Blueprint Configuration
- The following are appended to the Blueprint you selected above as part of the vCO workflow. I’ve changed the “Prompt User” value on the DRS Group Name property to yes.

- To make this more intuitive, we want that Custom Property to provide a drop down box, rather than being a free text field. So go ahead and copy ExternalWFStubs.MachineProvisioned.drsGroupName and then navigate to Infrastructure > Blueprints > Property Dictionary. The only one that must be exactly as I’ve shown is the Name. The rest you can alter, but make sure you tick the checkbox to make it a required field.

- Edit the Property Attributes, Type should be ValueList and Value should be your DRS VM Group names.

- Ok, this is where the rubber hits the road – time to test this baby out! Here I am requesting the Blueprint (yes, this is different to the Blueprint screenshot I used above – sue me).

- To show the live feed, here is a screenshot from the C# client, and the Orchestrator log.


- Finally, the end result.

As mentioned at the beginning of this blog post, a huge shout out to Eric Hardcastle and Nathan Wheat – I’m sure there will soon be many more example vCO and vCAC integrations appearing on this blog. If you have any use cases you’d like to see tackled then please leave your comments below.
Finally, the vCO package is attached if you’d like to make use of it.
com.vmware.library.vcac.drs.package