
This will be the last “admin” style post that I will write before we really start to get into the meat of working with the API. It’s not exciting, but important to get right. Read on, and if I’m going too slowly then you should skip to the end where we make our first request.
Prerequisites
When interacting with an API, you need to first have the means of crafting a HTTP request.
This can be done from the command line with cURL, using Invoke-WebRequest or Invoke-RESTMethod with Powershell, with the Python requests module…. the list is long and the options are many. To minimise time spent on incorrect syntax or fat fingers, I will be working primarily with Postman for this series. As we progress I will provide examples for cURL, Powershell and Python but to start off with all examples will be focused on Postman.
Before we start, perform the following steps.
- Download Postman.
- Import this Postman collection of the vRA 7.2 API.
- Import this Postman environment variables file.
- Open up the API docs at https://{{vra-fqdn}}/component-registry/services/docs
Note: I will be updating the Postman collection as I proceed with this series, so please let me know if there are any issues with it.
Elements of a HTTP Request
In order to have a well formed request, you need the following elements as described in more detail in my previous post:
- A Universal Resource Identifier (URI)
- A HTTP Method (in our case GET, POST, PUT, DELETE)
- Headers
- In the event that we use POST or PUT, we also need a request body.
You will note that if you look at the Postman collection that all of this (with the exception of the body) has been filled in for you.
Personas
When working with any product it can be a painful learning curve identifying what permissions are required to perform specific tasks. Because of this it can be tempting to create a super user with all of the powers known to mankind. I like to work with personas so that I gain a better understanding of the permissions required to perform specific tasks, but maybe I’m a masochist. VMware’s Cloud Management BU uses the following personas for vRA, so for the sake of simplification I will do the same.
1. Jason – the Cloud Admin.
The person responsible for installing and managing vRA. This account has the following roles:
System Administrator
Infrastructure Administrator
Fabric Administrator
Tenant Administrator
XaaS Administrator
Infrastructure Architect
2. Shauna – the DevOps Admin.
The person responsible for developing blueprints and catalog functions. This account has the following roles:
Business Group Manager
Application Architect
Software Architect
XaaS Architect
Catalog Administrator
3. Scott – The User.
This account is a member of Shauna’s Business Group and has no other roles.
Making Your First API Call
For the first few times we look at making a call I’m going to take you through the same process:
- Review the API docs to find what we need, including example body values.
- Find the relevant URI in Postman, and submit the request.
- Review the response, and consider what information we need from it to proceed in the event of chaining multiple requests together.
Remembering back to the previous post, one of the headers included a bearer token. Within a session, the very first call that you will need to make will involve submitting your username, password and tenant info and receiving a token back in response. Let’s get that one under our belt first.
- Open a browser and navigate to the docs at https://{{vra-fqdn}}/component-registry/services/docs
- Change the drop down in the header to “identity”.
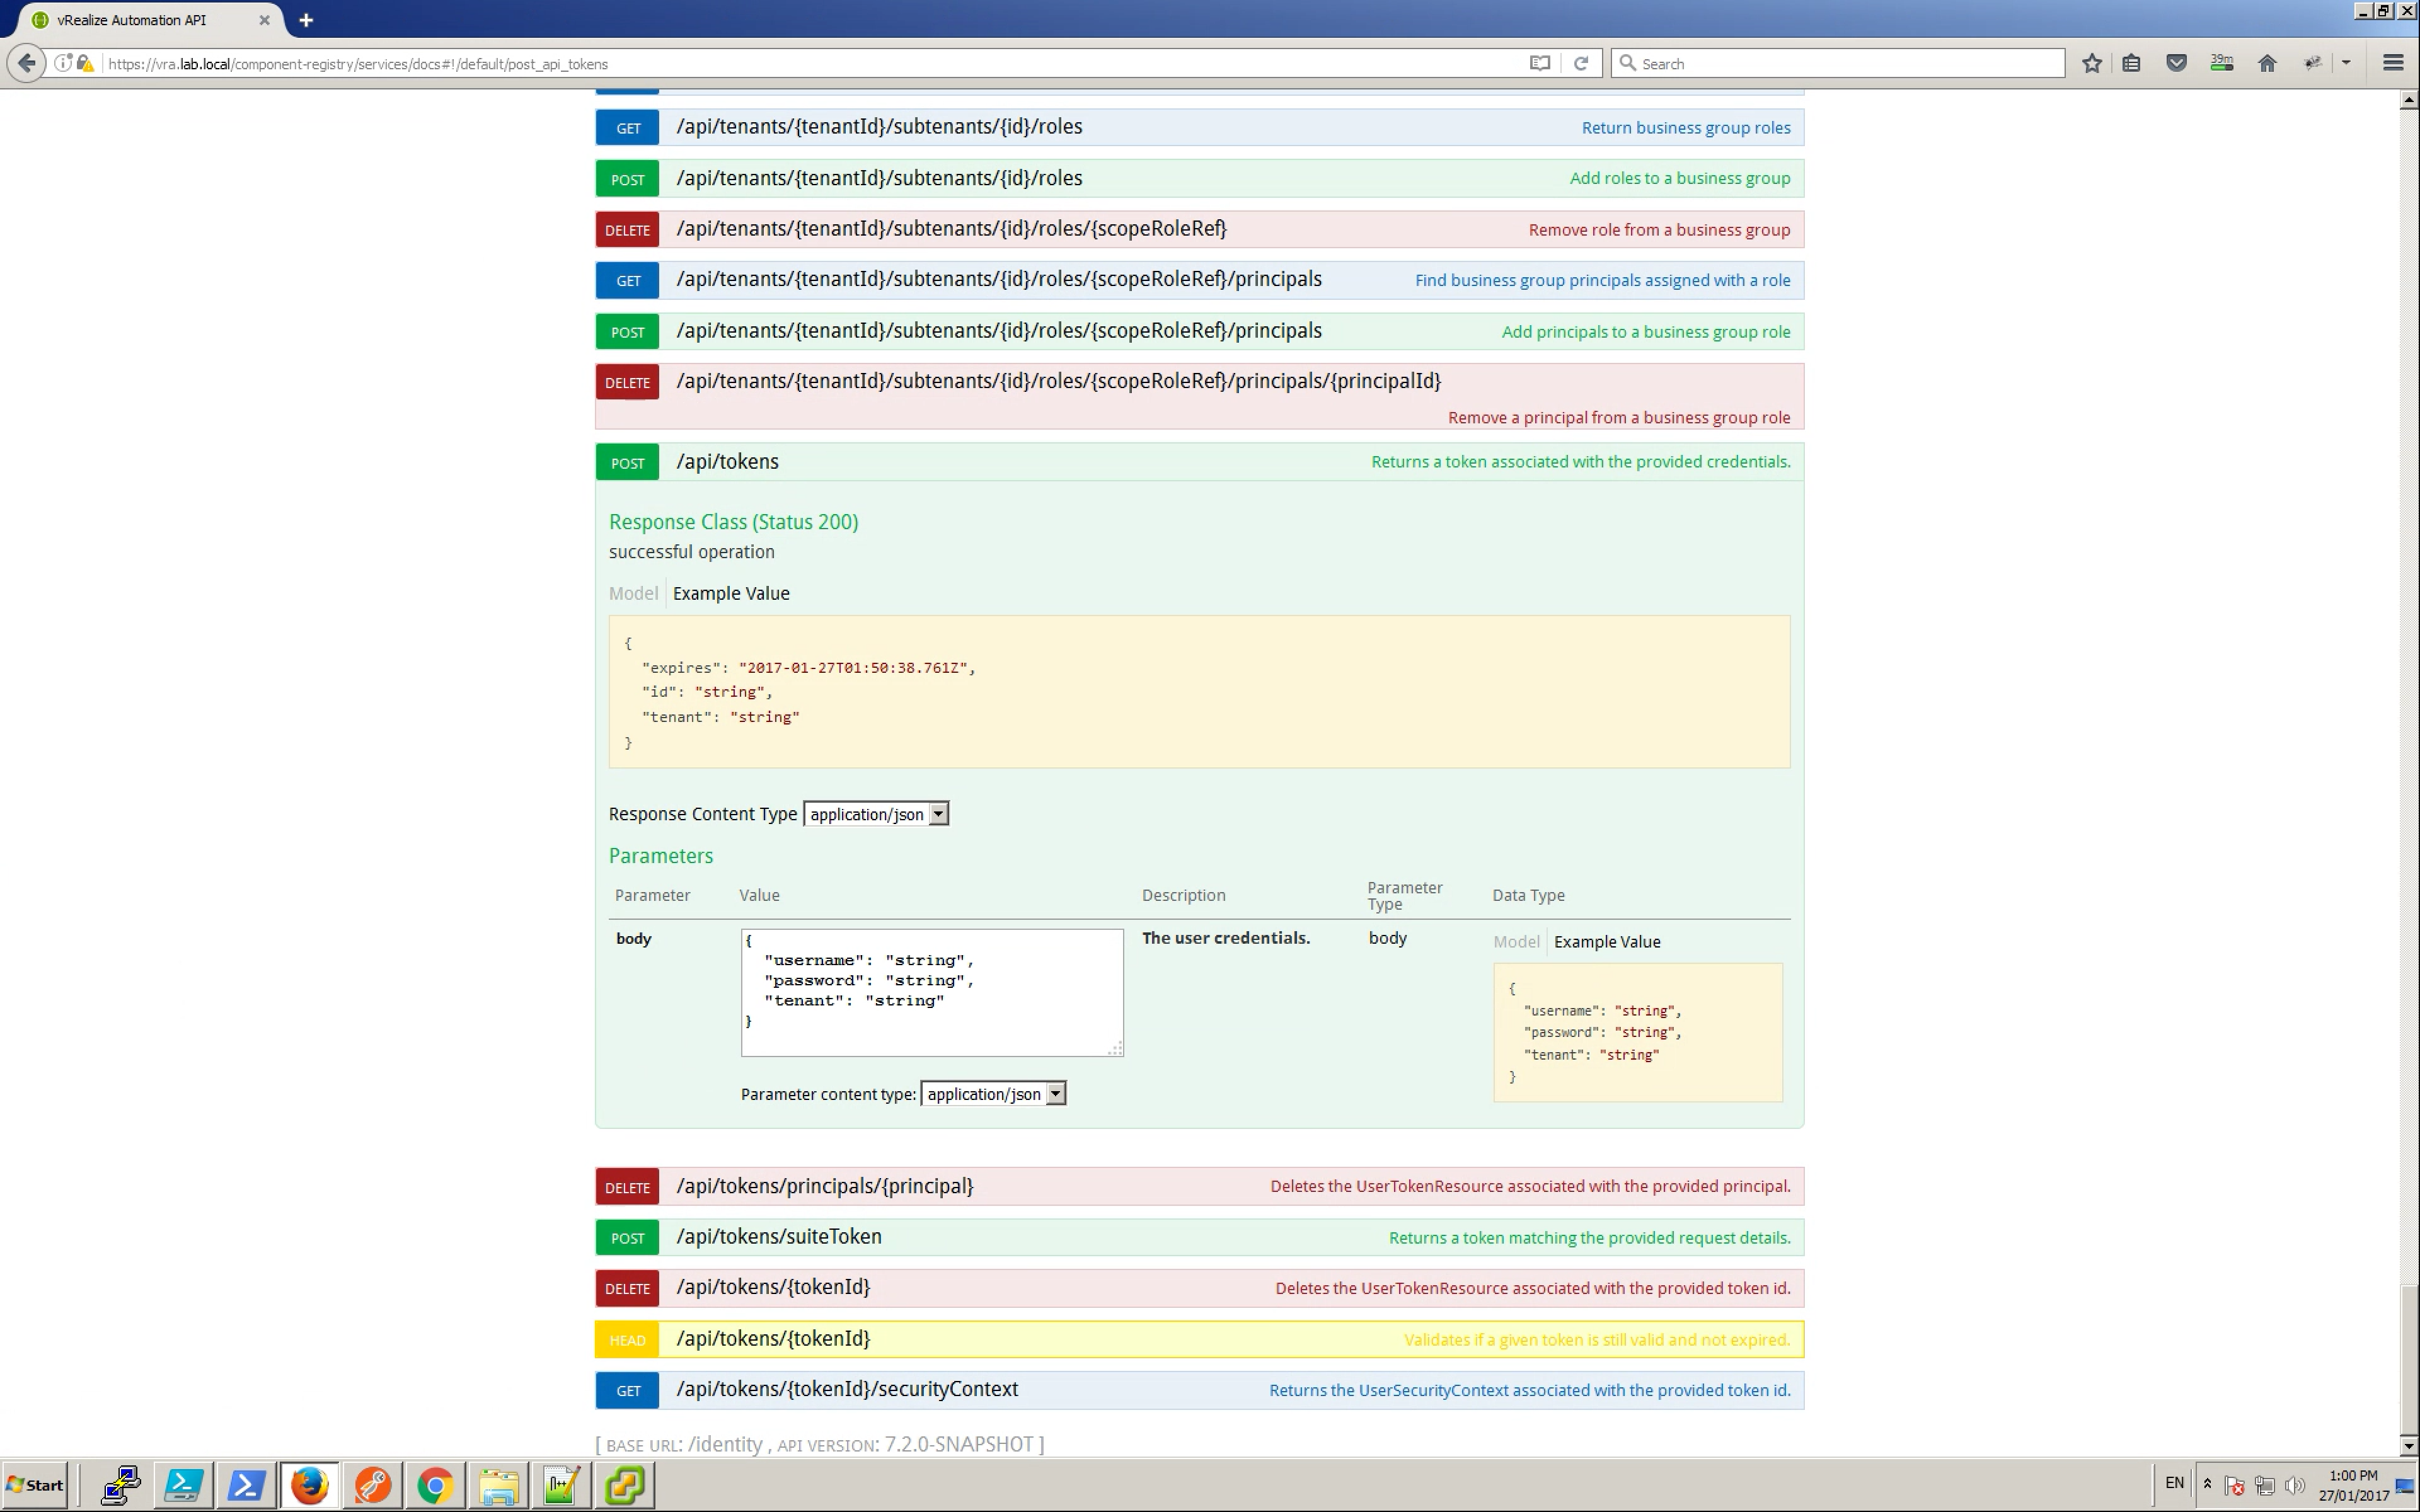
- Search for “credentials” or “token” until you find the URI as shown in the image below.
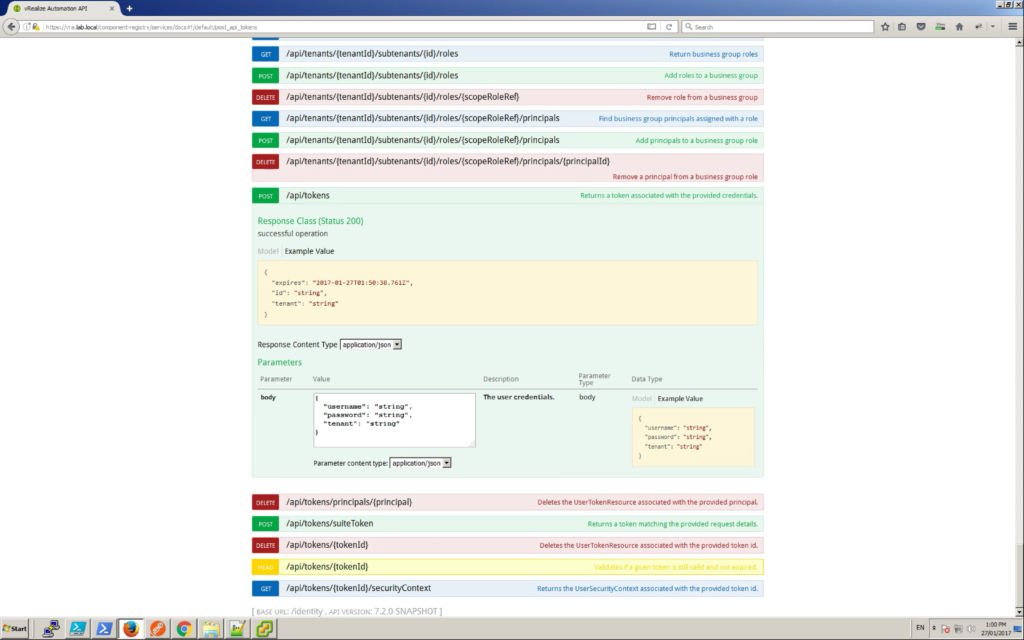
- By clicking in the yellow “example value” box you can populate the body with a sample that can be reused.
- Switch over to Postman and on the top left hand side switch from History to Collections.
- Click on the Identity Service folder to expand it out.
One thing to be aware of in Postman is that the search function only searches the description, and not the URI itself. This puts you a little at the mercy of the individual who wrote the description – the good news is that you can correlate the URI and the description in the API docs that you already have open. For our example, /api/tokens has a description of “Returns a token associated with the provided credentials”. You can search for this in Postman.
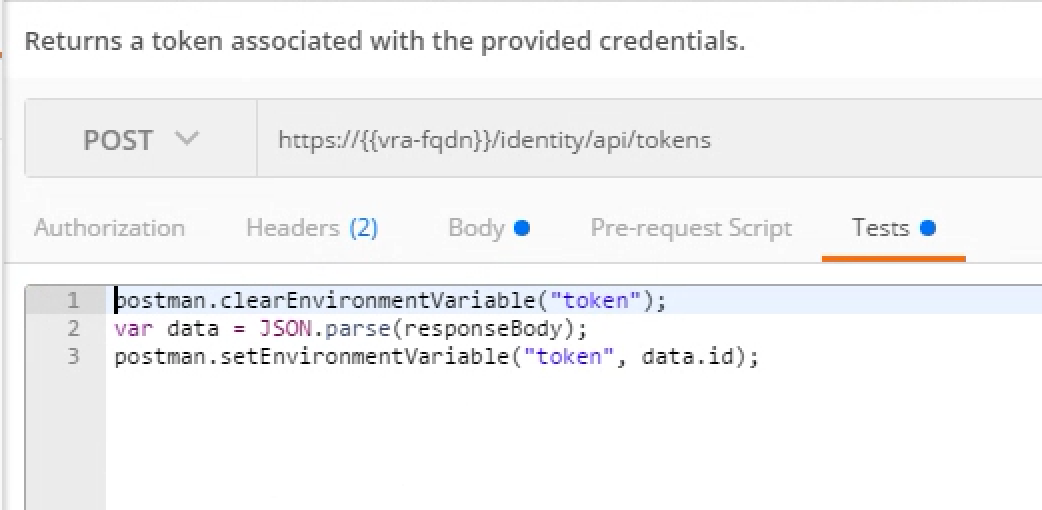
You will note that the URI is https://{{vra-fqdn}}/identity/api/tokens.
Anything in Postman bound by a pair of curly braces is an environment variable. To configure your own environment variables, click on the cog in the top right corner of your screen and select Manage Environments.
Assuming you’ve imported the Environment Variables provided then you will be able to edit the vRA72 values by clicking on the vRA72 link. This will open up a dialog as shown below.
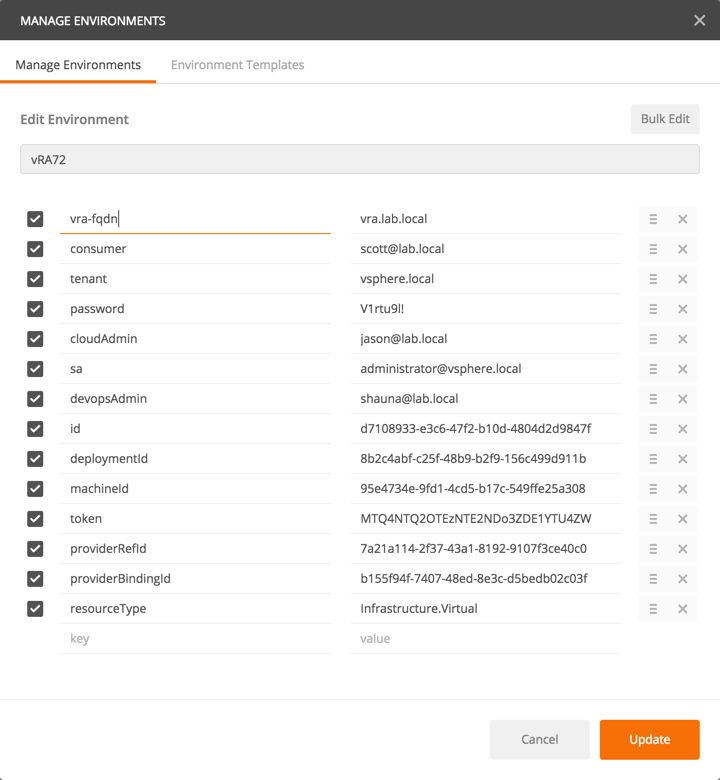
Edit the vRA FQDN value, and while you are there update the various persona values, passwords and tenant values. The user in question for this example doesn’t matter, as long as it’s valid in the system.
Switch to the Body tab of Postman and update to be and click Send.
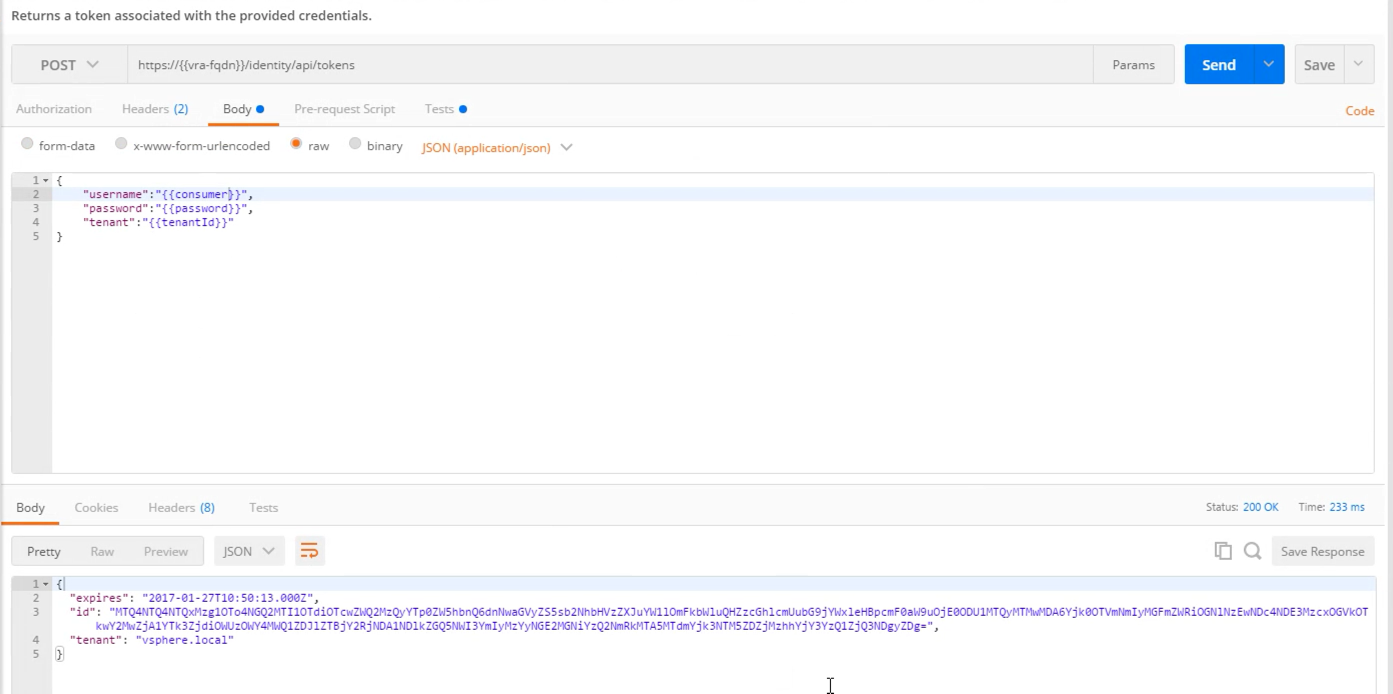
If your response looks like the image above, then you have successfully retrieved your Bearer Token. The question is, how can you easily reuse it?
One option is to manually copy it to an environment variable like you just did for your FQDN, but that’s a bit annoying. You could highlight the value, right click it and assign it to an environment variable – that’s somewhat better, but still not great.
The final option is to make use of the “Tests” capability that Postman provides. A little bit of javascript and you can have this value automatically updated for reuse. Remember that – it will come in increasingly handy as you begin to chain requests together.
Simple right?
In the next post we will build on this example and explore what we refer to as the “Consumer” API.