
In the second half of 2017, I had the chance to get quite hands on with Terraform. There were two main factors involved with this. Firstly, a number of my customers have invested heavily in Hashicorp, and in Terraform as part of that. Secondly, I want to be less myopic about in my learning, which is probably worth a blog post of its own.
About This Series
The goal of this series is to get you comfortable with the idea of Infrastructure as Code (IaC) in all of its glory. The examples will begin quite simple, and then increase in complexity as the series unfolds. If you have any questions at all, please leave them in the comments below. Each blog post will be accompanied by a link to a tagged repo that you can clone and follow along with.
Getting Started
I’m not a fan of blogging processes that are covered in official docs, so to get Terraform installed, please follow the official docs.
The vSphere Provider
Providers are the means by which Terraform communicates with the infrastructure/cloud/service that it is interacting with as part of your definition. For this series, I will be focusing on the vSphere provider, with a few cameos along the way from some other stars in the provider stable.
Below is an example configuration of the vSphere Provider using the standard Hands On Labs details. As explained in the provider documentation, the user, password and vsphere_server values are all mandatory. The allow_unverified_ssl attribute is optional and quite a time saver if you are using a self signed certificate.
provider "vsphere" {
  user                 = "administrator@vsphere.local"
  password             = "VMware1!"
  vsphere_server       = "vcsa-01a.corp.local"
  allow_unverified_ssl = true
}
If you’re thinking “man, he’s just putting credentials out there in plain text!” then just sit tight. We will look at variables in the next post, and options around securing these a little later in the series.
Resources
When you want to create and manage something with Terraform, you define it as a Resource. The example we will start with is the thing that you are most likely to want to manage - virtual machines. While you can create a shell and rely on PXE to build it, the example below uses cloning as the process for provisioning.
To follow along, please clone https://github.com/grantorchard/iac_for_vsphere_admin and then checkout part1 of the repo (git checkout tags/part1).
A quick note on the naming convention of the resource stanza.
1. The first unquoted block (resource) describes this as a resource that will be created and managed by Terraform.
2. The first quoted block prior to the underscore (vsphere) decribes the provider that will be used by this resource.
3. The text trailing the first underscore describes the resource type for the given provider.
4. The second quoted block is the name that you can use within this definition to reference the described object. In this case it is the same as the name of the object, but that may not always be the case.
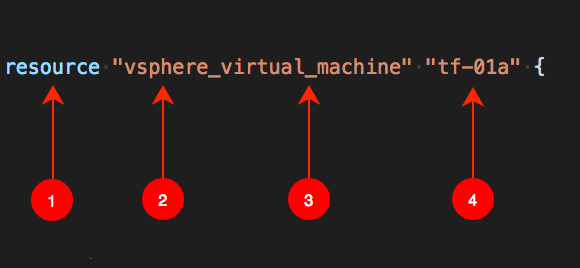
resource "vsphere_virtual_machine" "tf-01a" {
  name             = "tf-01a"
  resource_pool_id = "resgroup-102"
  datastore_id     = "datastore-61"

  num_cpus = 2
  memory   = 1024

  guest_id = "centos64Guest"

  network_interface {
    network_id   = "network-781"
  }

  disk {
    name = "tf-01a.vmdk"
    size = "10"
  }

  clone {
    template_uuid = "4208c2fc-55c2-5534-2336-2d6625fcef89"

    customize {
      linux_options {
        host_name = "tf-01a"
        domain    = "corp.local"
      }

      network_interface {
        ipv4_address = "192.168.110.202"
        ipv4_netmask = 24
      }

      ipv4_gateway    = "192.168.110.1"
      dns_server_list = ["192.168.110.10"]
    }
  }
}
As you can see, the definition relies on morefs and UUIDs to identify the vSphere constructs that the VM is going to be consuming. If you are thinking that it seems like a lot of work to look up the required morefs every time you want to provision something, you wouldn’t be alone. The good news is that there is another object type in Terraform that does the leg work for you - the Data Source.
Data Sources
To follow along with this example, checkout part1.1 of the repo (git checkout tags/part1.1).
Unlike resources, Data Sources are not managed by the Terraform definition you are working in. They may be managed by another definition, or completely unmanaged.
They are objects that you can reference and select attributes from to interpolate into Resources, or even other Data Sources. Data Sources collect/refresh on a number of different triggers - terraform refresh, terraform plan, terraform apply and terraform destroy.
Below is a Data Source for a vSphere Datacenter. You can see that it follows the same naming convention as described above for Resources.
Data Sources for the vSphere provider are discovered by name.
data "vsphere_datacenter" "regiona01" {
  name = "RegionA01"
}
To get the ID from this Data Source, we use the interpolation syntax.
data "vsphere_resource_pool" "regiona01-compute-resources" {
  name          = "RegionA01-Compute/Resources"
  datacenter_id = "${data.vsphere_datacenter.regiona01.id}"
}
The same interpolation model works for resources as well.
resource "vsphere_folder" "folder-01a" {
  path          = "folder-01a"
  type          = "vm"
  datacenter_id = "${data.vsphere_datacenter.regiona01.id}"
}
The example that you cloned contains additional Data Sources that are used in a typical vSphere definition.
Provisioning
To make use of the definition from the repo within your own environment, simply update the name attribute for each Data Source, and also update the Provider details. If you want to update the data source object name then you can do so, but you will then need to modify the interpolation to reflect the changes. One final thing to note - the customize stanza is different for Linux and Windows. The example is for Linux, if you want to clone a Windows machine instead then please take a look at this page to see how to modify the stanza.
To bring down the latest version of the provider run terraform init from the directory that the definition is in.
Once that completes successfully, issue terraform plan to confirm what is actually going to happen.
Finally, use terraform apply to instantiate the definition.
What you will find once the provisioning completes is that you have a terraform.tfstate file in your directory. It is definitely worth taking a bit of time to familiarise yourself with what is in this file. I would recommend dropping it into a json formatter to break out the keys into something a little more readable.
With that, you have taken your first steps down the IaC path. To destroy your virtual machine resource, issue terraform destroy and it will be pulled down, and the tfstate file removed.
In the next post I will introduce variables and we can start working with some other resource types.